 目录
目录大数据全系列 教程
1869个小节阅读:467.9k
目录


408考研
JAVA全系列 教程
面向对象的程序设计语言
Python全系列 教程
Python3.x版本,未来主流的版本
人工智能 教程
顺势而为,AI创新未来
大厂算法 教程
算法,程序员自我提升必经之路
C++ 教程
一门通用计算机编程语言
微服务 教程
目前业界流行的框架组合
web前端全系列 教程
通向WEB技术世界的钥匙
大数据全系列 教程
站在云端操控万千数据
AIGC全能工具班

A A
White Night
实战步骤
node1中进入/opt/flume-1.9.0/jobs/
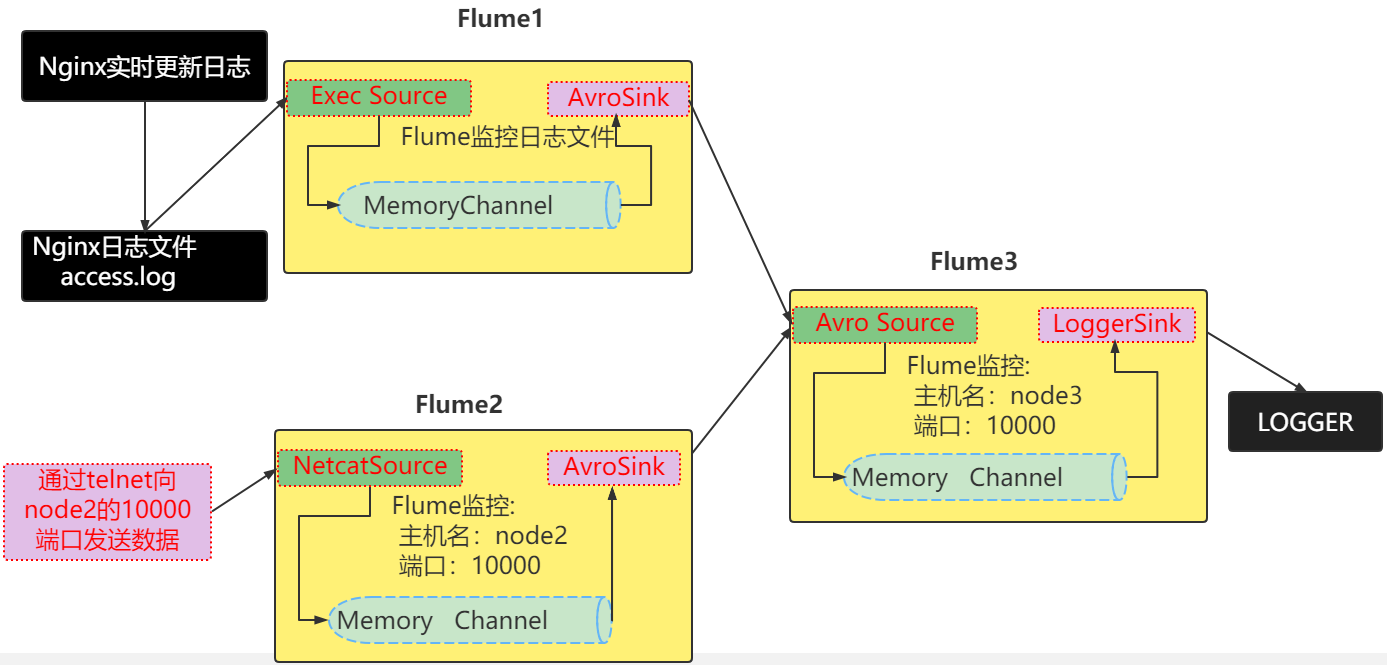
xxxxxxxxxx[root@node1 ~]# cd /opt/flume-1.9.0/jobs/在node1上创建配置文件agg1.conf,配置Source用于监控access.log文件,配置Sink输出数据到下一级Flume,配置内容如下:
xxxxxxxxxx[root@node1 jobs]# vim agg1.conf# Name the components on this agenta1.sources = r1a1.sinks = k1a1.channels = c1
# Describe/configure the sourcea1.sources.r1.type = execa1.sources.r1.command = tail -F /usr/local/nginx/logs/access.loga1.sources.r1.shell = /bin/bash -c
# Describe the sink# sink端的avro是一个数据发送者a1.sinks.k1.type = avroa1.sinks.k1.hostname = node3 a1.sinks.k1.port = 10000
# Describe the channela1.channels.c1.type = memorya1.channels.c1.capacity = 1000a1.channels.c1.transactionCapacity = 100
# Bind the source and sink to the channela1.sources.r1.channels = c1a1.sinks.k1.channel = c1
node2中进入/opt/flume-1.9.0/jobs/
xxxxxxxxxx[root@node2 ~]# cd /opt/flume-1.9.0/jobs/在node2上创建配置文件agg2.conf,内容如下:
xxxxxxxxxx[root@node2 jobs]# vim agg2.conf# Name the components on this agenta2.sources = r1a2.sinks = k1a2.channels = c1
# Describe/configure the source# source端的netcat是一个数据接收服务a2.sources.r1.type = netcata2.sources.r1.bind = node2a2.sources.r1.port = 10000
# Describe the sinka2.sinks.k1.type = avroa2.sinks.k1.hostname = node3a2.sinks.k1.port = 10000

# Describe the channela2.channels.c1.type = memorya2.channels.c1.capacity = 1000a2.channels.c1.transactionCapacity = 100
# Bind the source and sink to the channela2.sources.r1.channels = c1a2.sinks.k1.channel = c1
node3中进入/opt/flume-1.9.0/jobs/
xxxxxxxxxx[root@node3 ~]# cd /opt/flume-1.9.0/jobs/node3上创建agg3.conf,内容如下
xxxxxxxxxx[root@node3 jobs]# vim agg3.conf# Name the components on this agenta3.sources = r3a3.sinks = k3a3.channels = c3
# Describe/configure the sourcea3.sources.r3.type = avroa3.sources.r3.bind = node3a3.sources.r3.port = 10000
# Describe the sinka3.sinks.k3.type = logger
# Describe the channela3.channels.c3.type = memorya3.channels.c3.capacity = 1000a3.channels.c3.transactionCapacity = 100
# Bind the source and sink to the channela3.sources.r3.channels = c3a3.sinks.k3.channel = c3
先启动node3的flume
xxxxxxxxxx[root@node3 jobs]# flume-ng agent -c ./ -n a3 -f agg3.conf -Dflume.root.logger=INFO,console启动node1和node2上上的flume
xxxxxxxxxx[root@node1 jobs]# flume-ng agent -c ./ -n a1 -f agg1.conf -Dflume.root.logger=INFO,console[root@node2 jobs]# flume-ng agent -c ./ -n a2 -f agg2.conf -Dflume.root.logger=INFO,console如果Nginx没有启动,则启动nginx。
打开浏览器不断访问nginx页面
在node4上安装telnet包
xxxxxxxxxx[root@node4 ~]# yum install -y telnet
xxxxxxxxxx[root@node4 ~]# telnet node2 10000查看node3上的logger输出